Quickly create mobile applications with Turbolinks
21 March 2018

Imagine you are alone, or two working on a great project. You need to provide a web application + an Android app + an Ios app. What do you do? Do you create a web application using React, Vue then maybe use react-native to create mobile apps? React tends to add a lot of complexity and in the end, need experts to maintain it. Here are some podcasts talking about it:
I think there is a more productive way to do it. This more productive way involves using Turbolinks 5, its headline is: “Get the performance benefits of a single-page application without the added complexity of a client-side JavaScript framework.”.
Guess what by default Rails apps uses Turbolinks :)
This makes it super easy to create a web application (by the way rails is the most productive framework I know of) and mobile application. To create a mobile application we will just need to add one or to file to a template project.
Turbolinks is used to power Basecamp mobile apps as explained here and here
Let’s get started
The code source is available at https://github.com/jean-francois-labbe/use-turbolinks.git
First create a Rails app
First, you will need to setup ruby, I would recommend you to use ruby-install to install ruby.
Install ruby-install
Then ruby-install ruby
One day you will have or need multiple versions of ruby, to manage this I recommend you chruby
Install chruby
Then you will be able to use chruby ruby to automatically switch to the latest ruby version on your computer.
Now that ruby is installed
Run gem install bundler
Bundler is the great dependency manager that makes it easy to work with dependencies in ruby. Yes, if you know pip, you’ll love it. It even has had a dependencies locking mechanism for years that npm just added a few months ago.
Then install Rails
Run gem install rails
Generate a new project: rails new blog
This will scaffold everything for you.
Go into that project cd blog
Take time to explore all the file created. Here is the getting started
The application is empty let’s add something in it.
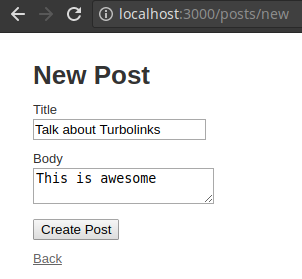
Run rails g scaffold post title:string body:text
Open the config/routes.rb file and make it look like this:
Rails.application.routes.draw do
  resources :posts
  # For details on the DSL available within this file,
  # see http://guides.rubyonrails.org/routing.html

  root to: 'posts#index'
end
The root to: makes the posts index page the root page of the web application
Run rails db:migrate as we have created a new resource post` the database schema must be updated.
Launch rails server rails s
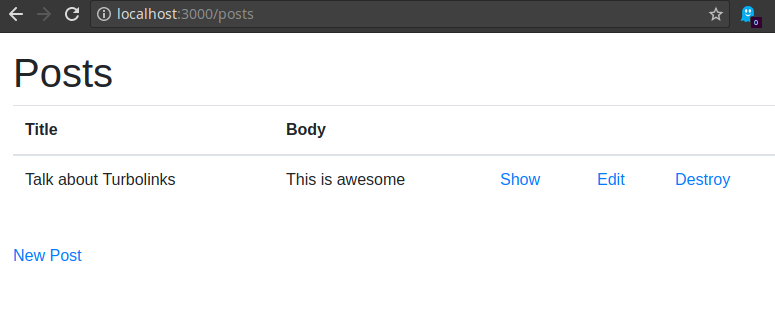
Open your browser and go to http://localhost:3000
This is the same as http://localhost:3000/posts because of the root to: 'posts#index'
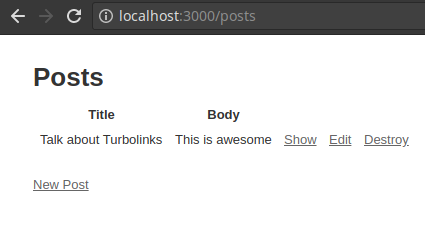
There you go you can list posts, create a new post, delete existing posts.
We’ll see later how to add some beauty in it.
We scratched the surface of what rails can do for you, it provides database migrations, WebSockets, background jobs, sending emails, preview emails, catching emails en dev, multiple environments configured (dev, test, prod)… Most web applications problems have already been solved in Rails, The beauty of it is that you won’t have to solve them again and most importantly maintain your implementation.
Plus there are a ton of battle-tested gems to help you create something faster, such as devise(user authentication), paper_trail(model history), stripe(online payment)…
Enter Turbolinks
We have a pretty awesome application we need now to validate early on if using a server-side rendered application + Turbolinks would be enough to provide a good user experience on mobile apps.
I will use only Android as I don’t have anything to develop for Ios.
First Setup Android Studio
Then create a new project with an empty activity.
Go to turbolinks-android
Follow their tutorial then you will have an android application that can bind to your rails application.
Your Activity will look like this:
package com.example.you.app;

import android.content.Intent;
import android.support.v7.app.AppCompatActivity;
import android.os.Bundle;
import android.util.Log;

import com.basecamp.turbolinks.TurbolinksAdapter;
import com.basecamp.turbolinks.TurbolinksSession;
import com.basecamp.turbolinks.TurbolinksView;

public class MainActivity extends AppCompatActivity implements TurbolinksAdapter {

    // Change the BASE_URL to an address that your VM or device can hit.
    private static final String BASE_URL = "http://192.168.1.16:3000"; //Change the IP to your point at the rails server most likely your computer IP
    private static final String INTENT_URL = "intentUrl";

    private String location;
    private TurbolinksView turbolinksView;

    @Override
    protected void onCreate(Bundle savedInstanceState) {

        super.onCreate(savedInstanceState);
        setContentView(R.layout.activity_main);

        // Find the custom TurbolinksView object in your layout
        turbolinksView = (TurbolinksView) findViewById(R.id.turbolinks_view);

        // For this demo app, we force debug logging on. You will only want to do
        // this for debug builds of your app (it is off by default)
        TurbolinksSession.getDefault(this).setDebugLoggingEnabled(true);

        // For this example we set a default location, unless one is passed in through an intent
        location = getIntent().getStringExtra(INTENT_URL) != null ? getIntent().getStringExtra(INTENT_URL) : BASE_URL;

        // Execute the visit
        TurbolinksSession.getDefault(this)
                .activity(this)
                .adapter(this)
                .view(turbolinksView)
                .visit(location);
    }

    @Override
    protected void onRestart() {
        super.onRestart();

        // Since the webView is shared between activities, we need to tell Turbolinks
        // to load the location from the previous activity upon restarting
        TurbolinksSession.getDefault(this)
                .activity(this)
                .adapter(this)
                .restoreWithCachedSnapshot(false)
                .view(turbolinksView)
                .visit(location);
    }

    @Override
    public void onPageFinished() {

    }

    @Override
    public void onReceivedError(int errorCode) {
        handleError(errorCode);
    }

    @Override
    public void pageInvalidated() {

    }

    @Override
    public void requestFailedWithStatusCode(int statusCode) {
        handleError(statusCode);
    }

    @Override
    public void visitCompleted() {

    }

    @Override
    public void visitProposedToLocationWithAction(String location, String action) {
        TurbolinksSession.getDefault(this)
                .activity(this)
                .adapter(this)
                .view(turbolinksView)
                .visit(location);
    }

    // Simply forwards to an error page, but you could alternatively show your own native screen
    // or do whatever other kind of error handling you want.
    private void handleError(int code) {
        if (code == 404) {
            TurbolinksSession.getDefault(this)
                    .activity(this)
                    .adapter(this)
                    .restoreWithCachedSnapshot(false)
                    .view(turbolinksView)
                    .visit(BASE_URL + "/error");
        }
    }
}
Then use Android Studio to deploy that on your phone.
Ensure your phone and your computer are on the same wifi, and that your rails server is still up and running.
Your android application will open up and display the rails web application and you will be able to interact with it.
Yeah, you did it.

Handle outside URL
Sometimes your web application needs to go to another web site then come back. Those times such as authentication using Gitlab or an OAuth provider.
Currently, if your rails application wants to send you to another website it won’t work because it won’t be on the same domain.
We can handle that.
Let’s say that our rails application send us on another domain for authentication, we can catch the authentication URL call and use another Activity to display it.
Well do that
Just add an activity such as WebViewActivity
package com.example.you.app;

import android.os.Bundle;
import android.support.v7.app.AppCompatActivity;
import android.util.Log;
import android.webkit.WebChromeClient;
import android.webkit.WebView;
import android.webkit.WebViewClient;

public class WebViewActivity extends AppCompatActivity {

    @Override
    protected void onCreate(Bundle savedInstanceState) {
        super.onCreate(savedInstanceState);
        setContentView(R.layout.activity_web_view);

        WebView webView = (WebView) findViewById(R.id.webview);

        webView.setWebChromeClient(new WebChromeClient());

        webView.setWebViewClient(new WebViewClient() {

            @Override
            public boolean shouldOverrideUrlLoading(WebView view, String url) {
                if (url.contains("your_return_url or /")) {
                    finish();
                } else {
                    view.loadUrl(url);
                }
                return true;
            }
        });

        String oauthUrl = getIntent().getStringExtra("location");
        webView.loadUrl(oauthUrl);
    }
}
Then update your main activity
package com.example.you.app;

import android.content.Intent;
import android.support.v7.app.AppCompatActivity;
import android.os.Bundle;
import android.util.Log;

import com.basecamp.turbolinks.TurbolinksAdapter;
import com.basecamp.turbolinks.TurbolinksSession;
import com.basecamp.turbolinks.TurbolinksView;

public class MainActivity extends AppCompatActivity implements TurbolinksAdapter {

    // Change the BASE_URL to an address that your VM or device can hit.
    private static final String BASE_URL = "http://192.168.1.16:3000"; //Change the ip to your local ip
    private static final String INTENT_URL = "intentUrl";
    public static final String OAUTH_URL = "users/auth/gitlab";

    private String location;
    private TurbolinksView turbolinksView;

    @Override
    protected void onCreate(Bundle savedInstanceState) {

        super.onCreate(savedInstanceState);
        setContentView(R.layout.activity_main);

        // Find the custom TurbolinksView object in your layout
        turbolinksView = (TurbolinksView) findViewById(R.id.turbolinks_view);

        // For this demo app, we force debug logging on. You will only want to do
        // this for debug builds of your app (it is off by default)
        TurbolinksSession.getDefault(this).setDebugLoggingEnabled(true);

        // For this example we set a default location, unless one is passed in through an intent
        location = getIntent().getStringExtra(INTENT_URL) != null ? getIntent().getStringExtra(INTENT_URL) : BASE_URL;

        // Execute the visit
        TurbolinksSession.getDefault(this)
                .activity(this)
                .adapter(this)
                .view(turbolinksView)
                .visit(location);
    }

    @Override
    protected void onRestart() {
        super.onRestart();

        // Since the webView is shared between activities, we need to tell Turbolinks
        // to load the location from the previous activity upon restarting
        TurbolinksSession.getDefault(this)
                .activity(this)
                .adapter(this)
                .restoreWithCachedSnapshot(false)
                .view(turbolinksView)
                .visit(location);
    }

    @Override
    public void onPageFinished() {

    }

    @Override
    public void onReceivedError(int errorCode) {
        handleError(errorCode);
    }

    @Override
    public void pageInvalidated() {

    }

    @Override
    public void requestFailedWithStatusCode(int statusCode) {
        handleError(statusCode);
    }

    @Override
    public void visitCompleted() {

    }

    @Override
    public void visitProposedToLocationWithAction(String location, String action) {
        if(location.contains(OAUTH_URL)) {
            Intent intent = new Intent(MainActivity.this, WebViewActivity.class);
            intent.putExtra("location", location);
            this.startActivity(intent);
        } else {
        TurbolinksSession.getDefault(this)
                .activity(this)
                .adapter(this)
                .view(turbolinksView)
                .visit(location);
        }
    }

    // Simply forwards to an error page, but you could alternatively show your own native screen
    // or do whatever other kind of error handling you want.
    private void handleError(int code) {
        if (code == 404) {
            TurbolinksSession.getDefault(this)
                    .activity(this)
                    .adapter(this)
                    .restoreWithCachedSnapshot(false)
                    .view(turbolinksView)
                    .visit(BASE_URL + "/error");
        }
    }
}
Notice how visitProposedToLocationWithAction has been updated to catch the authentication URL and display it in a new activity that is just an embedded web browser.
This way you can log in then return to the main activity and view its content.
Add some beauty
This is working but it’s now awesome.
Let’s make it quick with twitter bootstrap.
Rails fully embrace the javascript world and allow us to use yarn and even webpacker that will be preconfigured (another day not lost).
Run yarn add bootstrap
Open app/assets/stylesheets/application.css
Make it look like so:
/*
 *= require bootstrap/dist/css/bootstrap.min.css
 *= require_tree .
 *= require_self
 */
Open app/views/layouts/application.html.erb
Change the <body> to <body class="container-fluid">
Open app/view/posts/_form.html.erb
Make it look like so:
<%= form_with(model: post, local: true) do |form| %>
  <% if post.errors.any? %>
    <div id="error_explanation">
      <h2><%= pluralize(post.errors.count, "error") %> prohibited this post from being saved:</h2>

      <ul>
      <% post.errors.full_messages.each do |message| %>
        <li><%= message %></li>
      <% end %>
      </ul>
    </div>
  <% end %>

  <div class="form-group">
    <%= form.label :title %>
    <%= form.text_field :title, class: 'form-control' %>
  </div>

  <div class="form-group">
    <%= form.label :body %>
    <%= form.text_area :body, class: 'form-control' %>
  </div>

  <div class="form-group">
    <%= form.submit class: 'btn btn-primary' %>
  </div>
<% end %>
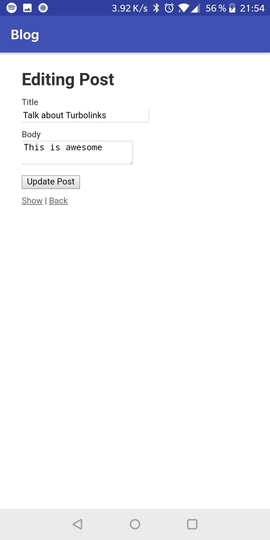
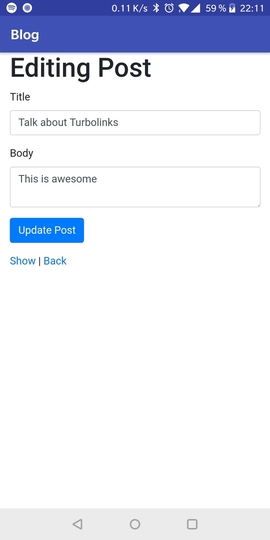
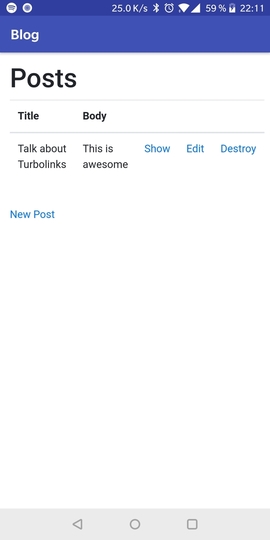
It will look like so on your browser:
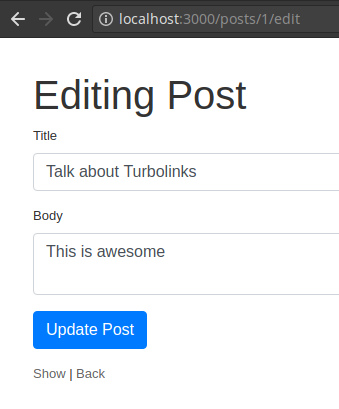
And in android:
The end.
That’s it, now you know how to create a basic rails app, scaffold a post, create a basic android application that can display your rails application
The code source is available at https://github.com/jean-francois-labbe/use-turbolinks.git
Do you feel productive?
Back